Showing posts with label hairstyles. Show all posts

Wednesday, February 17, 2016

HAIR: How I Wash My Hair Only Once A Week

 photo HairRoutine7_zps4rgp82lb.jpg
It started with scissors. And bleach. Bent over the kitchen sink at a boy's house, I watched the slightly soapy water circle the drain as he rinsed the Manic Panic bleach kit from my hair, freshly shorn by my own two hands into a short, choppy Courtney Love-inspired mess (here's your proof). After years of experimenting with over-dyes and coloring random chunks of my hair, I'd finally taken the plunge and bleached the whole thing after hacking it all off. It was exhilarating, ridding myself of all that hair and transforming the color into something completely different, but I never expected that kitchen sink metamorphosis to lay the foundation for one of the main beauty secrets that I still swear by more than a decade later...

I only wash my hair once a week...every five to seven days or so.

Back then the short length, dye job, and fact that I preferred the Buzzcocks and Bikini Kill over boy bands and Coldplay was excuse enough to forego regular shampooing. I quickly learned that "dirty" hair equaled perfectly messy hair. Hair that didn't require much attention beyond the occasional root touch-up and baby bang trim. And when it came to caring for my dry, bleached ends, allowing my hair to relax a little between shampoos made it softer and less prone to breakage. Time passed, and I eventually grew my hair out, changed it from blonde to jet black to half & half to brown and back to blonde again, let it grow some more, chopped it off again...and throughout these subsequent transformations and lengths, it never occurred to me to change up my shampoo routine. Why mess with imperfection? All these years later, I still only wash it about once per week, sometimes more, sometimes less. This is a fact that, when divulged, is often met with shock, questions and, admittedly, sometimes disgust (turns out, people really like to wash their hair). Now, in the interest of self-preservation and lest you think my habits are truly horrific, I assure you I do shower daily. But I've found that with less frequent washing my hair is healthier, grows faster, has fewer split ends, and is more resilient to chemical processes (though I haven't colored it in quite awhile). Oh, and I don't use dry shampoo and I hit the gym 3 to 4 times per week. I know... how?

Here's how:

 photo HairRoutine1_zpsvgts8v67.jpg
Sunday night, shampoo night: Before washing my hair, I brush through it thoroughly starting at the ends and working my way up using a natural bristle brush. Once in the shower, I wash my hair with a sulphate-free shampoo (my favorite is Living Proof PHD), concentrating only on my scalp and roots (the suds will run down and clean the remainder of my hair without causing extra drying and damage). I lather-rinse-repeat twice to clear away any buildup, giving my scalp a good massage at the same time. After rinsing, I apply conditioner to the mid-length of my hair to the ends and leave in for a few minutes before rinsing. Opposite of my only-wash-the-roots rule, I only condition the ends because they don't receive as many natural oils and moisture as the uppermost part of my hair. After patting dry with an Aquis hair towel, which helps absorb more water and dry my hair faster, I work a little oil into the ends -- either jojoba, sweet almond, or some balancing hair oil -- and allow my hair to air dry overnight.
 photo HairRoutine2_zpsijztgx5g.jpg 
Monday: My hair is usually still a little damp in the morning so, after brushing it back out I'll apply a little more oil to the ends (and maybe some styling cream) before drying it the rest of the way with a blow drier. If I have time, I'll use a curling wand and some dry texture spray to add a little texture to my otherwise pin-straight hair. If not, it's a messy bun day (truth: it's almost always messy bun day).

Tuesday: Since no blow drying is needed, after brushing out any major snags I add some loose waves in the front, spritz on some hairspray for hold and I'm out the door. If I can get away with it, this is my daily style. After work, I throw it in a ponytail for my workout. I don't mind a little sweat, and my head doesn't sweat that much anyway. When it comes to showering, I just put it in a bun and don't allow my hair to touch the stream of water.

Wednesday: I'm in a rush, so I play around with my part, parting it on the side and pulling it into a low ponytail. No brushing today, I like the mess.
 photo HairRoutine4_zpsowdv6whv.jpg
Thursday: My hair is finally (finally!!!) long enough to pull into milkmaid braids. It's grown about seven inches since my last major (awful) haircut in October 2014. Short hair was fun but a surprising amount of work without the help of bleach this time around, so I'm excited to see it getting long again. After brushing it out, I braid both sides and criss-cross it over my head, securing with some bobby pins. Out of my face and easy.
 photo HairRoutine3_zpsim9w12yd.jpg
Friday: Hat day. Brush it out, braid it up, slap a hat on top of it all. Hats fix many transgressions and today a large-brim western is hiding my roots. Pro tip: placement is everything when it comes to braided pigtails. Braid them close to the back of your head, instead of next to your ears, to avoid looking like a child. After my HIIT workout tonight, I brush it out and toss it up in a messy bun. If I'm going out, I'll probably wear a different hat or braid it again.

Saturday: I'm feeling lazy and I like how my hair looks after my weekend workout, so I decide to keep it in a high ponytail.
 photo HairRoutine6_zpshtf5jkxa.jpg
Sunday bun-day: The final countdown. Bun day. I usually just hang at home on Sundays, so I'm not worried if my hair doesn't look its greatest. Tonight, I'll repeat the process of washing it and, if my ends feel dry, I'll use a hair mask to deep condition and add in some much-needed moisture.

While this schedule doesn't necessarily ring true for every week, and there are definitely circumstances that warrant more frequent shampooing, this is the routine I generally find myself falling into and will probably stick to. Faster growth, no split ends, quick and easy...my hair has never felt better or looked healthier and I'm not gonna argue with that! At this point, the thought of washing and drying my hair daily, even every other day, is enough to make me cringe. As I've evolved over the years -- from the lowest of low-maintenance to loving hair and beauty -- I'm still not willing to spend more than a few minutes on it daily, which is something I believe my current and former selves would agree on.

I'm curious, what routine do you swear by? Are there habits you made when you were younger that you just never strayed from? Please share!
 photo HairRoutine5_zpsbznjtith.jpg

This post originally appeared here as part of my work with Free People. Images by Jana Kirn

Tuesday, March 10, 2015

My Hair Routine + How To Make Your Hair Grow Faster

 photo Orchid Grey Hair Routine 1_zpsfbjrs007.jpg
A couple months after moving to Philadelphia, I got a really bad haircut. Like, watching the stylist try to make it better kind of bad. Pay for it anyway kind of bad. Cry in the car kind of bad. I took a photo to send to Chris, but it has since been deleted. That kind of bad. At the time, I was in a low place already, for one reason or another feeling self-conscious about the way that I looked, thinking that a fresh haircut would put me right and bring back some confidence. Well, joke's on you, Julie. There's a lesson to be learned in there somewhere. After years of hiding behind my hair, there were now significant chunks of it missing.

Normally, when a bad cut happens I would take my own advice and call the salon to have them fix it, but in my case, the only fix was to get bangs, and I really didn't want to go down that road again. So, after my tears dried, I attempted to grin (by laughing at myself in the mirror) and bear it, and started the slow and (sometimes) painful journey of growing out my hair. There were at least a couple of bright sides: It was hat season. And... well, it was hat season, that's pretty much it. After toying with my hair, I found that I could twist the front section back in a sort of boho-half-up situation... and then cover it with a hat. You get the picture. Now, I'm not necessarily trying to grow my hair to the mermaid lengths it was before, though who knows, but my goal is to get it to a place where I can eventually have my friend in Pittsburgh or New Hampshire shape it up. And as much as I loved having shorter hair, I realized something surprising: Shorter hair is way more high-maintenance than long. Who knew? Probably everyone else. But I've managed to streamline my routine to a bi-weekly wash with an easy refresh each morning and in the process I've gained a few inches of length. Today I'm sharing my hair routine, read on to learn my tips and tricks for low key style and how to grow out a bad haircut:
 photo Orchid Grey Hair Routine 2_zpswcpbnpy2.jpg
 photo OrchidGreyHairTipsFeb152_zps52ca2dcf.jpg
Shampoo & Condition: I wash my hair twice a week and air dry it overnight. There's no set day, just when it starts to feel greasy and the hat comes back out. I've been washing my hair infrequently for years, a habit I picked up when it was short-short in college. I've had a few people ask what I do when I work out, and well, I just tie it back. My scalp doesn't really sweat all that much and it doesn't bother me. 

One of the biggest challenges when it came with dealing with my shorter, in-between length hair was figuring out which products to use. After using salon products for years, I had reverted back to some organic shampoo from the drug store that I had picked up when we moved. I realize now that it was pretty terrible stuff... I didn't realize just how unmanageable it made my hair until I started using the potions above. Yes, potions. As in, Living Proof PHD is pure magic. I have very thick, very fine hair, which can get bushy when the right products aren't applied. The PHD line from Living Proof cleans my hair, but doesn't make it feel parched. But the biggest difference has been in the texture, I almost (almost) don't have to do anything with it when I wake up, it's not puffy, not frizzy, it's made an enormous difference, and it even dries faster.
 photo OrchidGreyHairTipsFeb151_zps64448a70.jpg
Style: Save for the mousse, which I don't use as frequently, the products above are what I use from day to day to give my hair texture and hold.

Carol's Daughter Monoi Oil: I've used a few different oils on my hair, and I love that this one comes as a spray. I spray this on my air-dried hair from mid-shaft to end, and brush through before applying the PHD styling treatment.

TIGI Catwalk Session Series Hairspray: Ever since I worked in a salon years and years ago, I've had a love of TIGI products. This hairspray is weightless and leave may hair touchable and soft, while still providing plenty of hold.
 photo OrchidGreyHairTipsFeb153_zpsdbf15537.jpg
After washing and air drying my hair, in the morning I spray on some Monoi oil before working a dime-sized dollop of PHD styling treatment through the ends. 
 photo OrchidGreyHairTipsFeb154_zpsb9bb261f.jpg
I apply the product mostly to my ends, and then when there is just a little left on my hands I brush them over the top of my head to tame fly-aways.
 photo OrchidGreyHairTipsFeb155_zpsac952432.jpg
Now that my hair is a bit longer, I don't use the mousse as much, but if I'm using mousse for texture, I'll work some through the ends after the styling cream.
 photo OrchidGreyHairTipsFeb15_zps3c9cdbdb.jpg
Once I've applied product, I break out the blow drier -- a CHI low EMF professional drier -- and dry it the rest of the way through by twisting back sections away from my face and briefly holding the drier against them.
 photo OrchidGreyHairTipsFeb156_zps821e8bbd.jpg
 photo OrchidGreyHairTipsFeb157_zps7a6e5160.jpg
I allow my hair to cool like this while I do my makeup.
 photo OrchidGreyHairTipsFeb158_zpse42bd6f8.jpg
 photo OrchidGreyHairTipsFeb159_zps4f9046d8.jpg
For the final touch, and to ensure the choppy front section of my hair doesn't get too Friends-era Jennifer Aniston, I heat up my curling wand and, using a light touch, curl back the front section and add texture to the rest by wrapping sections of hair once or twice around the barrel. I then set everything with hairspray and comb through lightly with my fingers.

For the few days following, all I need to do in the morning is refresh the curls which takes about five minutes.
 photo Orchid Grey Hair Routine 3_zpsn40qqx3u.jpg
If you're thinking about growing out your hair, or are in the process, I commiserate. It sucks, but I've learned a few tips and tricks that can make the journey a little less bumpy:

- Resist the urge for major change. If you're someone who likes to change up your style, this can be difficult, especially if you're dealing with a cut you don't like. It's tempting to try and "fix" it or make things different, but if your goal is longer hair, or to grow out a bad cut... resist... resist! Getting bangs or bleaching it all just adds extra trouble... something I have to constantly remind myself.

- Step away from the heat. I still heat style my hair, but it's at a minimum. Exposing your hair to high heat can cause damage, like split ends and brittleness. Try air-drying it instead.

- Supplement. If you're vitamin B deficient, your hair and nails won't grow as fast. Supplement with a hair, skin, & nails vitamin that contains vitamin.

- Hydrate & eat healthy. Protein and iron play a key role in generating healthy hair and promoting growth. Eat whole foods, cut out as much sugar and processed foods as you can, and drink plenty of water.

- Style and reshape if you can. One of the worst parts of growing out your hair is the inevitable "awkward phase" that you will hit. Schedule a trim every few months to have your style reshaped. Trimming your hair won't actually make it grow faster, but trimming off the split ends will keep it looking healthy and lessent the amount you'd have to trim if you waited.

+ Do you have any tips for making your hair grow faster? Please share!


Thank you to Living Proof for kindly providing their products... I am now addicted. Opinions are my own.

Thursday, December 6, 2012

Hair-Do How-To #7: The Faux Under-cut

Photobucket
Photobucket
Photobucket
1. As always, dirty hair works best for this. Decide of the placement of your part- a deep side part works best.
2. Using a fine-tooth rat-tail comb, make your part and comb the lower "shaved" section straight back against your scalp.
3. Smooth the combed section beneath the crown of your head, allowing some loose strands to fall over it.
4. Using bobby-pins, secure the combed section of hair so it lies tightly against your head.
5. Spray with hairspray (I spray my hand, then run it over my hair so it doesn't look shellacked).
6. Using a curling wand or curling iron, add curls to the loose section of hair, break apart and set with hairspray.

Optional: If you'd like a little more texture, rub some pomade or styling cream between your hands and sprunch through your hair, being sure not to run your fingers through (this will just weigh it down).

After this post, I received a number of requests for tips on creating a faux-half shave (or undercut). I've been wearing my hair like this a lot lately and, yes, this hairstyle is basically early-90s mall hair. No, I do not in the least feel self-conscious about this. I remember standing in front of my bathroom mirror as a kid, holding one half of my hair back and thinking it would just look so cool if it were shaved. I have no idea where on earth I could have seen this hairstyle back then, since I had very little access to any media or pop culture, but something, somewhere made an impression. So yeah, I'm all about the resurgence of undercuts and shaves. And, by the looks of the Tracy Reese SS13 runway show and the Rachel Antonoff SS13 presentation, the look will stick around a while (not that it matters, do what you want with your hair! Be free!). A faux-undercut is the perfect way to change up your hairstyle without the commitment of breaking out the razor.

Want more? Go here for more tutorials and tips and tricks for long hair. Have a how-to request? Let me know in the comments section!

Product details:
Hairspray: Tresemme
Curling wand c/o Missako

Wednesday, June 6, 2012

How To: Grow Out Your Bangs and Not Go Bananas

Once upon many times, I've had bangs...baby bangs, Betty Page bangs, Vampira bangs (ouch), and most recently, just long bangs...
...and just as many times as I've had them, I have grown sick and tired of them.
In February, I reached my "bangs breaking point" for this round, and decided to grow them out. In the past this process has been far from easy, but this time for some reason, it's pretty much been a breeze. I think it was just time to get rid of them, I was sick of styling them, sick of cutting them, and I was only pleased with their appearance once or twice a week. It's funny, because as soon as I pinned them back, I felt more awake and alert, it was like pulling back the curtains. While I can still look at old pictures like the one above and reminisce, I really don't miss them. If you're currently facing the arduous process of growing out your own fringe, here are a few things I've found that make the long process a little less painful...

First thing's first, when I wash my hair, I immediately pin my bangs off to the side and allow them to dry that way (I air dry my hair overnight). 85% of the time there is a bobby pin holding them down, and I always sleep with a bobby pin in so they don't get in my face and remind me of their existence.

Rule number one: pretend they don't exist, bobby pins help with this charade.

Try experimenting with different ways of pinning your fringe back, this will add variety to your routine and lessen the urge to just trim them already and be done with it. Try a center part with a messy ponytail a la Pamela Love's Fall 2012 Presentation:

Try pinning them straight back and pulling your hair into a high ponytail or bun, enjoy the sun on your forehead and the feeling of alertness that comes over you:

You can also try to work with styling your growing fringe along the way. For me, this usually results in more frustration, so I suggest you do this sparingly, as you may be tempted to snip if you get irritated. If you have the patience of a saint however, try curling them off to the side and setting with a healthy dose of hairspray:

Once they start to grow, it'll be easier to hide your bobby pins, and styling your hair as if your bangs already don't exist will become second nature (or, at least, a little easier):

On the weekends (and who am I kidding, most days), I typically wear them styled in a little twist off to the side. This is an easy style that isn't ruined if I get annoyed and throw my hair up in a bun halfway through the day (this usually happens):


Play around with how you part your hair. Sweeping some length over your fringe easily conceals the shorter pieces (and makes you feel- secretly- like Jessica Rabbit):
I also recommend playing around with different braiding techniques. I'm actually not doing this too much myself this go-round, but braids came in super handy when I was growing out a set of fringe a couple of years ago.

If you get tempted to grab the scissors- and you will, I can almost guarantee it- don't do it. Look at pictures of fringe-less ladies on Pinterest, think of how greasy bangs get so easily. 

Essentially: remind yourself constantly of why you're growing them out. 

The process is a slow one, for everyone, but if you learn how to wrangle them early on, it's easy enough to forget they even existed.

Feel free to share tips of your own for growing out your bangs in the comments section!

Tuesday, April 24, 2012

Hair Do How-To #6: Beachy Waves 2.0

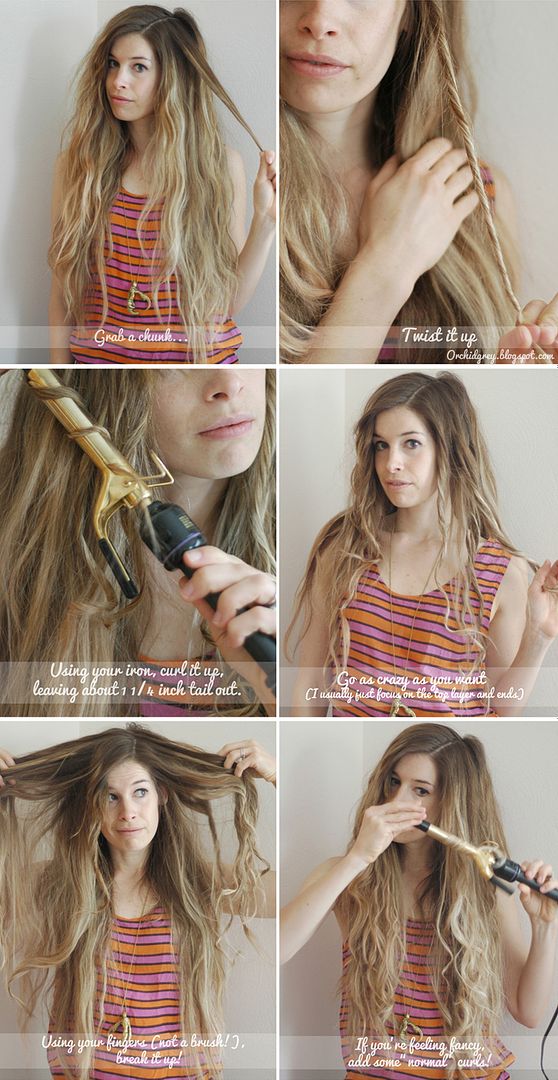
I might own the oldest curling iron known to man, I have no idea where it came from, but it's served me well over the many years I've had it. This is a great technique for those of you looking to achieve beachy, undone waves, but want to avoid the "Shirley Temple" effect that traditional curling irons are known to cause. Unlike most of my tutorials, I recommend starting with clean hair, simply because it's easier to break apart the curls once they're set. This is my go-to hairstyle lately, if I'm running low on time in the morning- which, let's face it, is always- I can throw in a few curls in the top layer and curl the ends and I'm done. Happy styling!

Wednesday, September 14, 2011

Wedding Style File: At The Salon

(photos taken by Adria)
Belt: American Apparel
Cat Pin: Thrifted ($1)
Shoes: Thrifted ($10)

Please excuse the picture-heavy post. And the bra-straps. It was my wedding day after all, and on your wedding day you can get away with these sort of things. As much as I will preach DIY and low-maintenance hair, I've always loved going to the salon, especially for big events. I've been going to the Cut Off Salon & Day Spa since high school, and even worked there from 2006 to 2007 as a receptionist. So there was no question where I would be going for my wedding-day hair and make-up. Per my practice appointment, I knew my hairstyle would be vintage-inspired, and decided to dress accordingly. I had a few last-minute errands to run afterwards, and didn't want to be running around town with fancy hair, and no fancy outfit to match! I chose this ModCloth dress by Dear Creatures because it's comfortable and conveniently buttons up the front, a key feature so as not to have to pull the dress over my perfectly coiffed hair when it came time to change. I kept the accessories simple by adding a brown belt and little kitty pin, something I had completely forgotten about until I found it buried in a bag full of thrifted wedding supplies!

Also, this was too cute not to share:


This little diagram is from my practice appointment with my stylist, Michelle T. After wrangling my hair into a beehive, she smartly decided to draw herself a diagram for my day-of hair. I have so much hair to wrangle, it requires scientific formulas!

Monday, March 7, 2011

Easy hair tutorial: Waves

This post is coming super late coming, I know, but I wanted to share a simple way of achieving a wavy effect on your hair. The best part is that you don't need extra long hair to do this, if you can make a little bun, you're set. I've been doing this a lot lately, it's easy and saves my hair from the scorching heat of the curling iron I usually use.

To start: This style is best achieved with freshly washed hair. Blow dry your hair until almost completely dry.
(optional): I run a flat iron over my bangs and around the crown of my head to smooth flyaways. Work some smoothing creme into locks for shine and control. I like S Factor Smoothing Lusterizor.

This next step is a little dweeby, but I swear, it's worth it:
Separate your hair like you're going to make low pig tails, starting on one side, work some texturizing paste (I like Garnier Surf Hair) into ends and twist away from your face to make a tight bun. secure with a couple of bobby pins. Repeat on the other side.

Now keep yourself busy for about 30 minutes. If I were to do this on a work day, I would spend this time getting dressed and ready. But since it wasn't a work day for me, I made lunch, did some dishes, and recited Princess Leia monologues (when in Rome, right?).
When you feel as if your hair has percolated long enough (or you get antsy), take out the buns and shake it out. your hair may be a bit chunky, gently separate but don't comb it! Spritz with hair spray, and admire yourself.
What I'm wearing: Sweater: LOFT (swapped), T-Shirts: Madewell, Necklace c/o Noble Town Vintage

Wednesday, September 22, 2010

Hair-Do How-to #5: Heidi Braids

Heidi braids have been my go-to style lately (as evidenced by yesterday's post). They're easy, keep my hair out of my face, and relatively painless. I did these kind of fast, they can be as messy or as sleek as you would like. For this style you will need: A comb, bobby pins, invisible hair bands, and some hairspray. Have fun and send me a link if you try this!